Gloss
Gloss is a measure of how well a surface reflects light in a specular (mirror-like) direction.
In industry, gloss is crucial for assessing the aesthetic and functional qualities of products.
A High gloss finish is often desired for its visual appeal, giving surfaces a shiny, sleek, and premium look, commonly seen in automotive finishes, consumer electronics, and high-end furniture.
Low gloss or matte finishes are used to reduce glare and provide a softer, more subtle appearance, which is preferred in certain architectural coatings and household appliances.
Gloss measurement helps ensure consistency and quality control in manufacturing processes, influencing customer satisfaction and product performance.
Material | 60-Degree Gloss Value |
|---|---|
Automotive Clearcoat | 85-95 GU |
Semi-Gloss Paint | 50-75 GU |
Satin Paint | 25-35 GU |
Matte Paint | 5-15 GU |
Polished Metals | 300-950 GU |
Perfect Mirror | 1000 GU |
Gloss GU (Technical Gloss)
The Aesthetix measures the amount of light reflected from a material in a specific, controlled manner according to ISO 2813 and ASTM D523 international standards.
The Aesthetix measures gloss using the "universal" measurement geometry of 60 degrees, the most widely used measurement for understanding glossiness of a material.
Gloss Calibration
Aesthetix instruments are supplied with a ISO 17025 high gloss calibration tile in accordance with the relevant standards.
Measurement of Gloss

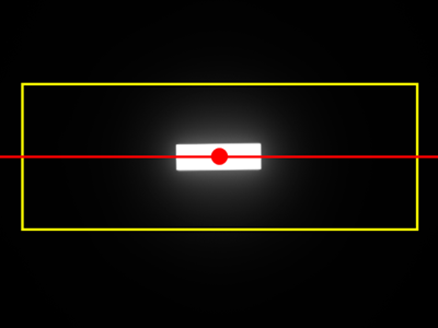
Aesthetix measures by projecting a rectangular image on to the sample surface which is reflected onto an internal camera sensor. The camera sensor measures the amount of light reflected in the Gloss ROI shown in yellow in the figure.
Surface Characteristics that determine Gloss
Surface texture present on a surface material (roughness, micro roughness, and nano texture) will reflect a mixture of specular and scattered (diffuse) light.
The refractive index of a coating determines the proportion of light that is reflected from the surface (gloss) compared to the amount absorbed within the basecoat or substrate.
Metallic and special effect coatings contain mirror like facets of mica or metal flake will demonstrate increased gloss due to light reflected within the from these elements.
Highly background colours- for example white & yellow exhibit a slightly higher gloss level than absorbent colours black, dark grey, etc.
For multilayer transparent materials, gloss values can be increased due to multiple reflections within the material.
Where is gloss used?
Quality Control in Manufacturing: To ensure consistency and quality of products, gloss measurements can be taken at various stages of production.
Surface Treatment and Finishing of low to mid gloss material: After processes like painting, varnishing, to verify that the desired level of gloss has been achieved.
Comparative Analysis of materials with the same background colour: When comparing different batches of materials or products to ensure uniform appearance.
Surface Damage Assessment: To assess wear, fading, or other surface changes over time.
Measurement Advice
Make sure the instrument is placed flat on the surface Regularly calibrate the instrument, once per day is recommended. For curved surfaces use the curved surface measurement adapter.
Measurement Advice—Curved Surfaces
It is not advisable to measure curved surfaces with a radius of <0.5m with the standard Aesthetix setup.
The instrument is supplied with a curved surface/small parts adaptor which reduces the measurement spot to 2x4 mm- this makes it suitable for curved surfaces.
Measurement Advice—Complex Parts
For complex shapes or small radius parts it is difficult to correctly position the instrument during measurement - for best results
Measure non-contact using measurement stand or cobot.
Use bespoke 3D printed jigs.
Measurement Advice—Small Areas
It is possible to measure small areas using curved surface/small parts adaptor use the "live view" to correctly position the instrument before measuring.
Gloss Disadvantages compared to Visual Gloss
Standard Gloss is does not match customer perception when comparing different coloured materials.
Gloss measurement alone does not detect surface effects that reduce the appearance quality of high gloss materials- such as Haze, Orange Peel and poor sharpness.
Measurement tip-When to measure with Standard Gloss
Standard gloss measurement is Important for quality control of materials with existing specifications, Aesthetix standard gloss measurements are fully compliant with ISO and ASTM international norms.
Backward compatibility with customers instruments- Aesthetix 60 degree gloss values are perfectly correlated to those supplied by Rhopoint IQ or NG glossmeters or BYK Micro Gloss instruments.
When a quantitative measurement of light reflection is required.
For Gloss measurements that better correlate with perception use VISUAL GLOSS.
For high gloss surfaces- Haze, Sharpness and Waviness are often superior predictors of surface quality than Gloss measurement.
Measurement tip-Standard When Standard Gloss is important
Backwards compatibility with existing measurements : Standard gloss measurements are fully compliant with ISO and ASTM international norms.
Regulatory and Technical Specifications: Many industries have defined standards for gloss levels that need to be met. In such cases, using a glossmeter ensures compliance with these technical specifications.